How to correct/help a bowed acrylic sump

revaltion131

Active Member
View Badges
Joined
May 22, 2008
Messages
206
Reaction score
58
Location
Michigan
Rating - 0%
0   0   0
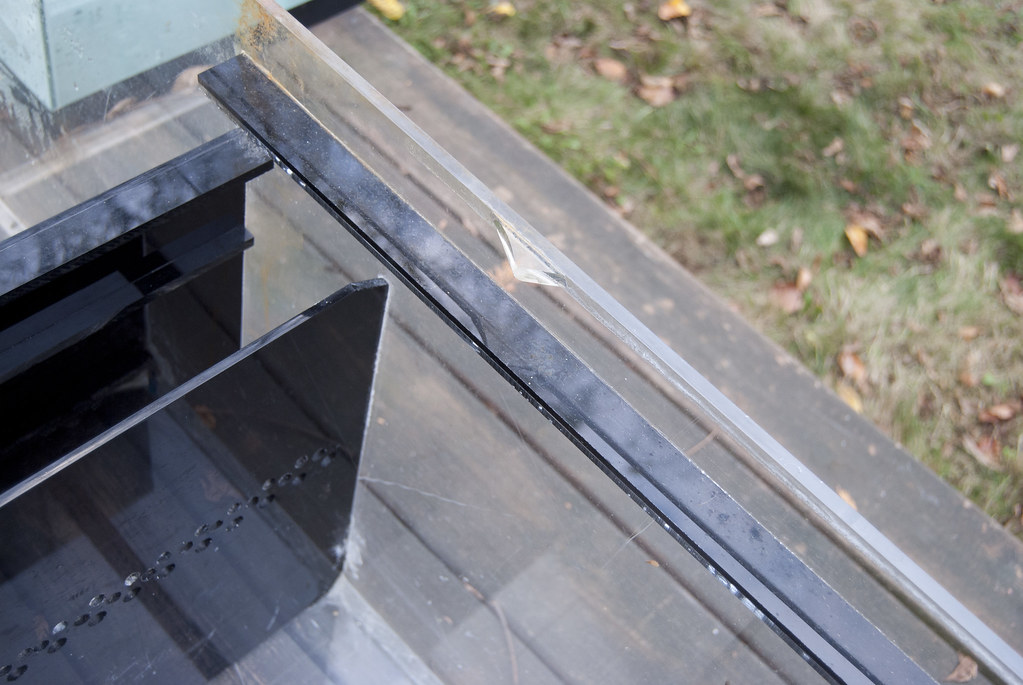
Hi everyone. I picked up a used acrylic sump for a new build and of course, the long walls of the sump are mildly bowed. The sump is 72"x24"x18". There is a spot along the rim where a brace of some sort was clearly broken off. I have no details on what was or wasn't there, how it was structured, why it was removed, etc.

I want to straighten the bow completely and would like to know if that's possible. If so, what methods would you use? My initial thought for correcting the bow is to use some big bar clamps to carefully pull it back into place but I don't really know what to do to keep it in place once that's done. I've considered creating two braces to span the tank, made out of pvc, with broad plates on either side where the brace would anchor to the sump so that the pressure is distributed but I honestly don't know if that's truly a good idea or not. How would you go about it?

If the bow can't be corrected, what are my options for providing the walls with some long-term support?

Thanks!

 
Not much of an acrylic expert but if you could clamp it and glue on an acrylic top to form some kind of eurobracing that might help hold it together.... Just an idea, not 100% sure it would work but it would be the route I would go if I had the same problem. Or use thicker acrylic and make an L shaped kind of lid (With access openings and cross bracing) to go all around the top of the sump. then clamp the sump and slide the lid over top and when you release the clamps it should hold the pressure...
 
I try hard to never glue to acrylic that has held water. The stresses involved can release when attacked by the solvent, and cause crazing and cracking. It's possible if you let it dry long enough, but still something to be avoided.

Just bending it back is pointless, it'll bow again when you release it, or when water is put in. That middle brace that is missing is a critical part of the sump. The wall thickness is probably not thick enough to support that span without the brace.

I'd suggest concentrating on a mechanical clamp mechanism, and not try to glue to it.
 
I try hard to never glue to acrylic that has held water. The stresses involved can release when attacked by the solvent, and cause crazing and cracking. It's possible if you let it dry long enough, but still something to be avoided.

Just bending it back is pointless, it'll bow again when you release it, or when water is put in. That middle brace that is missing is a critical part of the sump. The wall thickness is probably not thick enough to support that span without the brace.

I'd suggest concentrating on a mechanical clamp mechanism, and not try to glue to it.

Curious, do you think my lid idea could work then?
 
I'm not an acrylic expert, but I have an idea that I'm hoping some of the more seasoned acrylic workers can let us know if it would work or not.

What I would do is measure the width (outside wall of one long side to the outside wall of the other long side) at the corrected angle (not bowed)
  • cut a few pieces of acrylic to a length of a few inches longer than the corrected width of the sump and two or three inches wide
  • then cut perpendicular slots in the acrylic pieces you just cut that you will slide over the walls of the sump to act as braces.
(see my crappy paint mockup)

If the sump is 24" side, cut the new braces at 27 or 28" so you have a bit of an overhang, make the notches an inch or two deep. The braces should slip down over the walls of the sump and prevent it from bowing out as badly.

Now the concern I have is how something like this may affect the structural integrity of the sump. Without knowing how badly bowed it is, and how long it has been that way this may put undue stress on the steams and cause a rupture.

export.png
 
Let it dry out for at least four weeks and see if the bow corrects itself. Then go from there. You can add a eurobrace if you router the top edges clean. Anything else would be a waste of time.
 
Bolt together a frame of square aluminum tubing (3/4" or 1"?) to go around the outside top of the sump. (kind of like a square belt around the top). At 72" long, you may need a brace going across, holding the side pieces, in the middle part of the sump. That top brace will also prevent the frame from ever slipping down.
Once it's on, using a brush, give the remaining 3 sides of aluminum tubing that is exposed, a coat of aquarium safe silicone. Coat the 4 sides of the brace the same way and then bolt it to the frame.
Shouldn't be too ugly, it'll be perfectly square again and it'll never move. That's my idea.
 
Wow. A ton of really helpful input, thank you all! Definitely digging the two bracing ideas. @Rip Van Winkle I assume you mean to coat the frame with aquarium safe silicone to act as a preventative against corrosion?

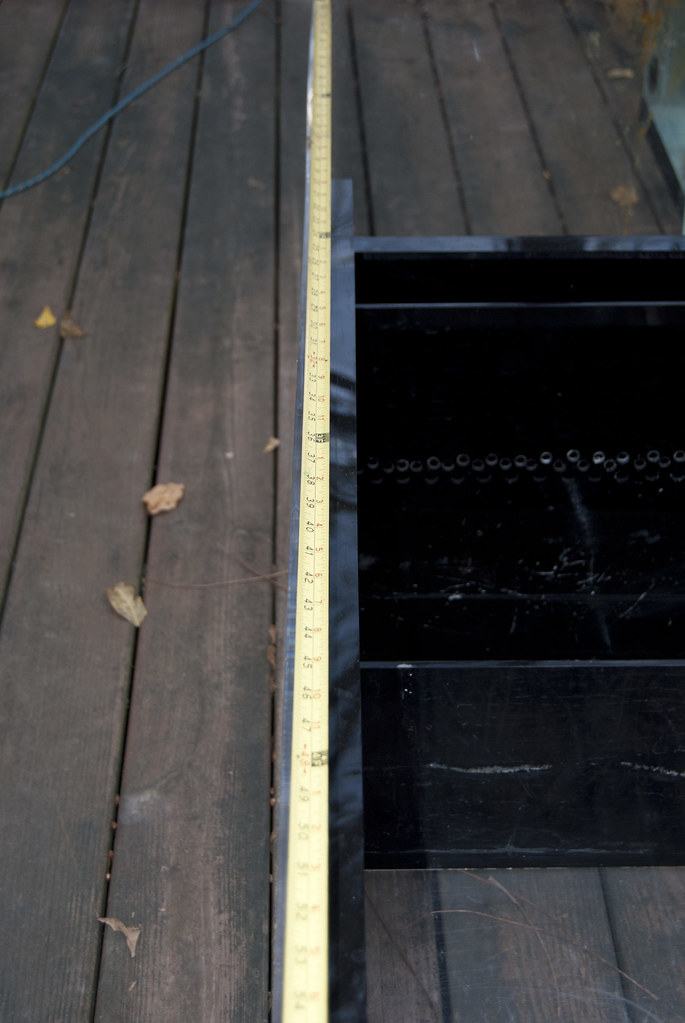
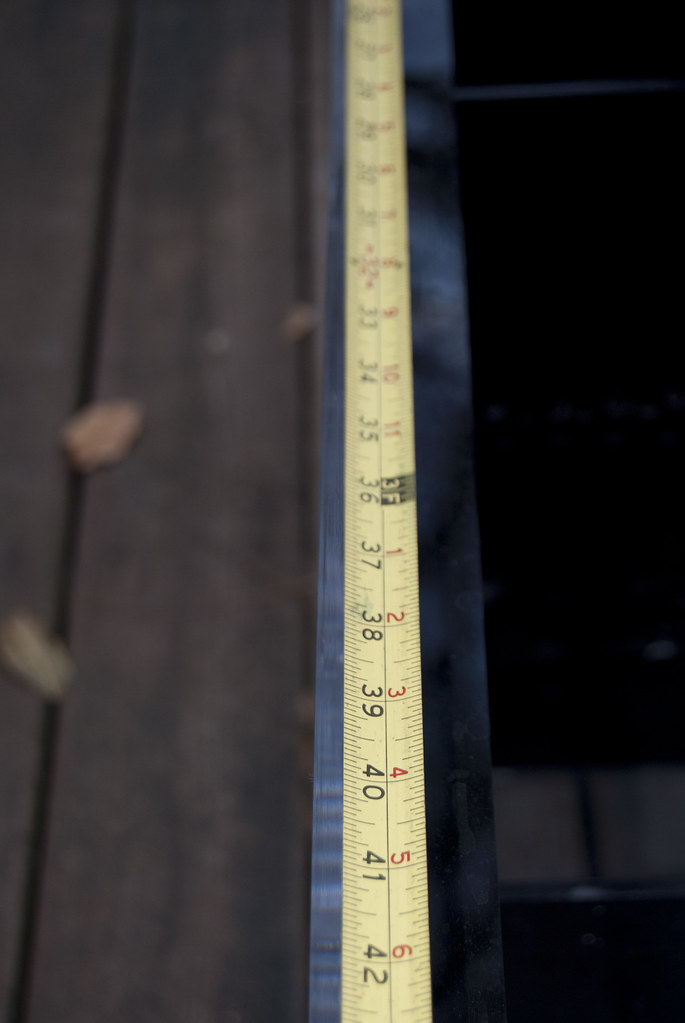
Using a tape measure as a straight edge, we measured the bow last night and it's maybe half a centimeter out on each side. Very mild, as I said, but we still want to do everything we can to ensure structural integrity, for obvious reasons. I'm really wishing whoever removed the brace hadn't, but I also understand why they did it: the brace looked like it reached over the only section which makes sense to house a skimmer in and would've made it nearly impossible to change your cup, if the skimmer even fit, unless your skimmer were drastically undersized for the system.

@cromag08 I've got a few questions for you, sorry. The top rim has been dry for months but we have had small amounts of water in the lower sections while cleaning it out (lots of the usual sand and gunk on the bottom). Should we still let it dry for four weeks before attempting to add a eurobrace? Is there a specific thickness of acrylic and width of the bracing you'd recommend using? We'd gotten Weld-on 16 for gluing in a custom acrylic filter sock holder and were hoping to maybe use that instead of silicone on some blown baffle seams. Would that also be sufficient for gluing the eurobrace? Is crazing a big concern, as @Zephrant brought up?
 
I would not worry about crazing in this situation. If you attached a photo I could even tell you if you need a eurobrace. Bowing is just something that can happen with glass or acrylic. A small amount of bowing isn't going to be of a concern.

I'd recommend 3/8" for the Euro, Plexiglas g. Do NOT use scigrip 16, but rather 3 or 4. Silicone does not bond well to plastics, so I would avoid that.

To do this properly, you would need to run it through a table router to clean off the top four panels. Each needs to be completely smooth, even and "finished" for welding. Then you'll need to make the Euro cutout. One piece is best with maybe one or two cross braces. Then learn how the "pins" method works for welding. A bad weld will come apart within the first few months.

This is not an easy task (to do it the correct way), and even as a professional, I would turn down a job like this. But it can be done!

Now that I think about it...... was the bow half a centimeter when it was full as well? Also, if the top rim was flame polished the wrong way), you'll run into welding issues. If it was hand polished (the correct way) then you're good with the method stated above. Flame polishing destroys the acrylic and basically makes it unsafe to weld unless you cut it down a few inches.
 
Last edited:
Here are some shots. Left them as big as possible so please feel free to click on them to go look at them full-size if you need to. The acrylic is 3/8" thick. The first two shots are of the bow, with the close up at the widest point. The tape measure is lined up perfectly on both ends with the corners so that you can see the deviation from "straight". The third shows the broken-off brace. The long black piece you see running along the long wall is about 2" down from the rim and 3.5' long, on both sides.


I see. Yes, I mentioned silicone as a stain/corrosion preventative.
As I see your sump now, myself I mightn't have thought to brace it. Seems like the aluminum bracing is a waaayyy overkill. I imagined far worse. See what everyone else says.
 
So is the missing brace only a foot or so from the end panel then, not the middle?

The black strip is your euro bracing, if that is still intact I'm not very worried about the missing brace.
That strip does give you an easy place to put in a mechanical brace or two though.

Not quite enough information to make a definitive call, but I'd be leaning towards trying to glue in a replacement brace (or two) to the euro-braces. But as Cromag said, if it is flame polished it'll crack.

And as already mentioned, it needs to be really dried out.
 
Thanks a lot for that. I'm not 100% sure about the span of the bracing that's gone. There are marks that make it look like there was additional bracing as far along the tank as that lower eurobracing. Is there any way to tell if this is flame polished or not?
 
If it was in front of me I'd look for places that it was over-heated and tiny bubbles were formed. Find that, and it's been flame polished, but the absence of them doesn't tell you anything.

Some close/large DPI pictures of the edges might help us guess for you. You can also take some Weldon #4 and put a few drops on a polished area. If it doesn't get micro-cracks in it, you are probably safe.

Ammonia in Windex can cause cracking on flame polished edges too.
 
Thanks, again! I've got Weldon #4 so I'll throw some on in a small tester area and see what we've got to work with, after we let the sump dry up completely. :)
 

IF YOU HAD TO TAKE A REEFING EXAM, WOULD YOU PASS?

  • Yes!

    Votes: 32 45.7%
  • Not yet, but I have one that I want to buy in mind!

    Votes: 9 12.9%
  • No.

    Votes: 26 37.1%
  • Other (please explain).

    Votes: 3 4.3%

New Posts

Back
Top