For some reason when I look for the wifi none of my droid devices or even my lap top pick up the "wifi-socket" as listed in the manual. So I can't do much. Anyone have any ideas? I tried turning off the light and plugging it back in in case it would restart something but no luck. I also tried bringing my devices right up to the light in case the signal was just weak or something. It's just not working.
Navigation
Install the app
How to install the app on iOS
Follow along with the video below to see how to install our site as a web app on your home screen.
Note: This feature may not be available in some browsers.
More options
You are using an out of date browser. It may not display this or other websites correctly.
You should upgrade or use an alternative browser.
You should upgrade or use an alternative browser.
Orphek wifi help
- Thread starter Triggreef
- Start date
- Tagged users None
Users Who Are Viewing This Thread (Total: 0, Members: 0, Guests: 0)
Wrong setup in the admin of the fixture
Press the reset button on top of the fixture and follow the admin settings exactly from the Orphek manual.
I had a heck of at time at first also
Did you buy it used? If so it will have the wrong settings for you.
There is a little hole in the top just press it to reset the wifi
Press the reset button on top of the fixture and follow the admin settings exactly from the Orphek manual.
I had a heck of at time at first also
Did you buy it used? If so it will have the wrong settings for you.
There is a little hole in the top just press it to reset the wifi
OP
OP
I got it new, I won it from the grow out contest. Just getting it set up now. I didn't see and holes except for the fan. It is the compact if that helps. I'll check again for anything I might have missed.
Ok it's the compact. Same one I have. Its a small hole in the top next to one of the fans.
Then follow this to the tee
https://orphek.com/atlantik-manual-section-2/
Congrats on getting the fixture !
Do you have a wireless home network?
Then follow this to the tee
https://orphek.com/atlantik-manual-section-2/
Congrats on getting the fixture !
Do you have a wireless home network?
Last edited:
OP
OP
Ok it's the compact. Same one I have. Its a small hole in the top next to one of the fans.
Then follow this to the tee
https://orphek.com/atlantik-manual-section-2/
Congrats on getting the fixture !
Do you have a wireless home network?
Yes but I have an apex system as well so I'm not sure how that will work with the static IP and such. I was figuring I would just leave it as a direct connection to my tablet.
Your network will give it its own IP separate from all other devices even if your apex is static.
Its a pain but hang in there!!
Its a pain but hang in there!!
OP
OP
Well I got it working now, I guess you have to hold down that button for a couple seconds to reset. I'm good with just that tablet connection through wifi, seems to work just fine!
Right on!!
Now there is a trick to setting up the times so the channels don't reset.
If you goto my thread with Orphek you will see what you have to do to break down the timelines to avoid this issue.
Now there is a trick to setting up the times so the channels don't reset.
If you goto my thread with Orphek you will see what you have to do to break down the timelines to avoid this issue.
Orphek
Orphek- Aquarium LED lighting
View Badges
Platinum Sponsor
Partner Sponsor 2023
Partner Sponsor 24
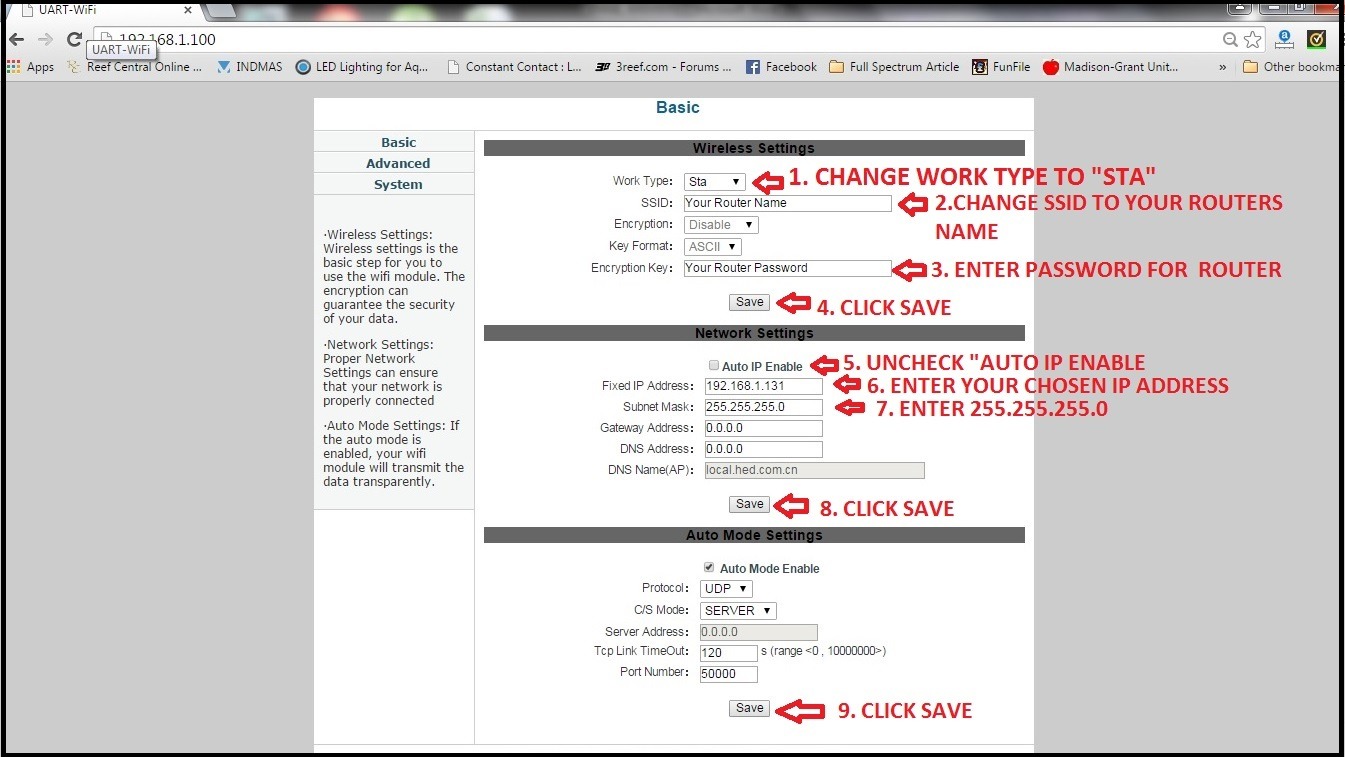
2.7- Connecting one Atlantik to your home network and assigning static IP addresses (BEST METHOD)
Connecting the light to your home router and setting a static IP address will ensure that your lights are accessible even after months of operation without changes. Keep in mind that the Orphek Atlantik series is designed to operate without continued need for programming and changes. The system will continue to follow its program daily until you make a change via the app. The Atlantik series does not require continual connection with the app or with other lights in order to operate. All lights operate on their own, via their internal circuitry. This eliminates the reliance on a master unit or device to control the lights 24/7. The system is designed to be set and then allowed to work on its own for years without changing. We suggest that any changes be well planned and as infrequent as possible.
When setting an IP address, most routers use 192.168.1.xxx where xxx is the actual location of the device on the network. Some routers use 10.0.0.xxx. You will need to determine the IP format that your router uses. If you are unable to determine this you can try the 192.168.1.xxx setting and if needed you can perform a factory reset to restore the light and begin again.
When choosing your IP address, Orphek suggests using an IP address that’s not likely to cause conflicts. For this reason we suggest using IP addresses higher than 120. For example; 192.168.1.121 or 192.168.1.122
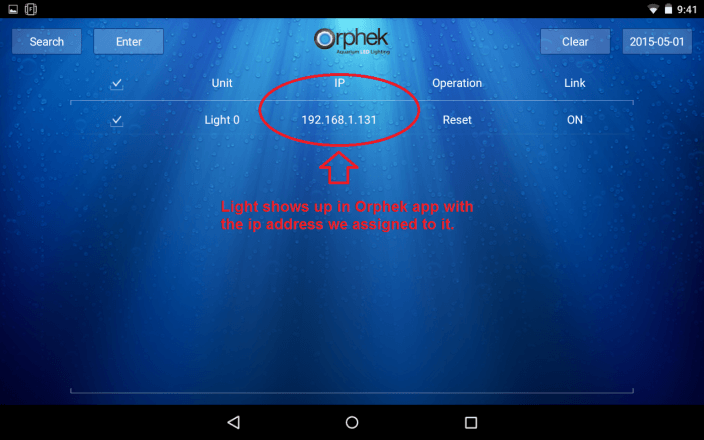
When assigning multiple lights to a network it is beneficial to keep the lights grouped in a series in order to make it easier to keep them straight. As you can see in the examples, only the last three numbers change so you could do 121, 122, 123,124 … In this example we will be setting a light to the IP address of 192.168.1.131
The subnet mask will always be the same for the lights. 255.255.255.0
Your router info and password must be EXACT with capitals, spaces, number and symbols. Please have this info onhand before entering it into the firmware. If a mistake is made and the light restarted, you will need to perform a factory reset in order to restore the firmware and begin again.
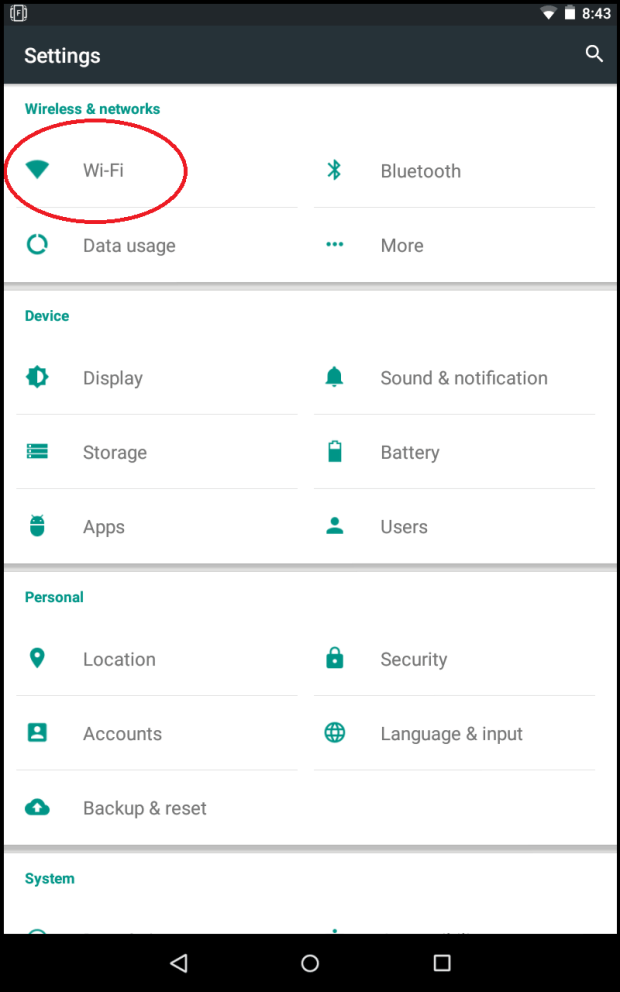
Connect to wifi-socket in your android settings.


You will now access the firmware in the light using your web browser. This can be Google Chrome or any other web browser that is installed on your Android device. Please keep in mind that you must remain connected to “wifi socket” while performing these steps.
Open your web browser and type “192.168.1.100” in the address bar.

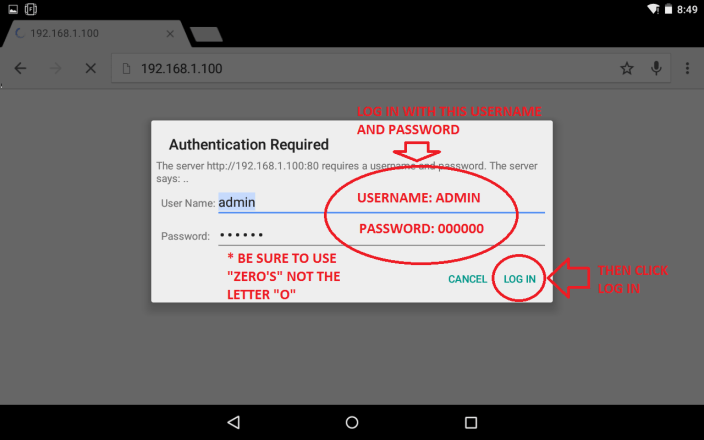
This will bring up the UART firmware screen and prompt you for a username and password.

Once you have accessed the firmware screen you will make a few changes and restart the system.

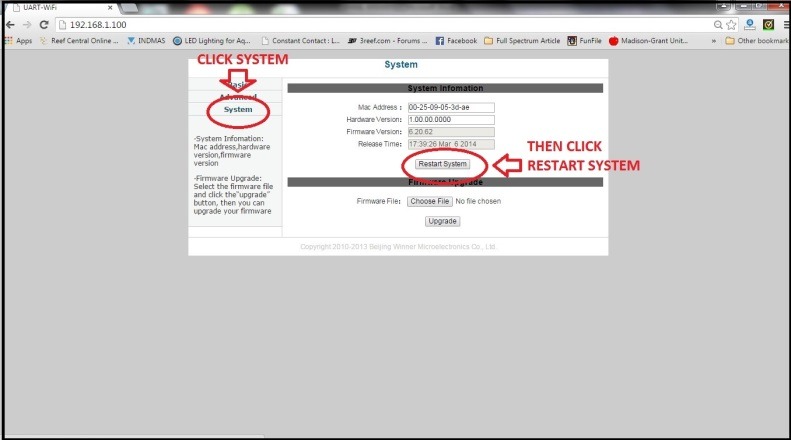
Once you have entered all of the correct info and ensured that it is all correct. You will need to restart the system. PLEASE VERIFY THAT ALL INFO IS CORRECT BEFORE RESTARTING THE SYSTEM.
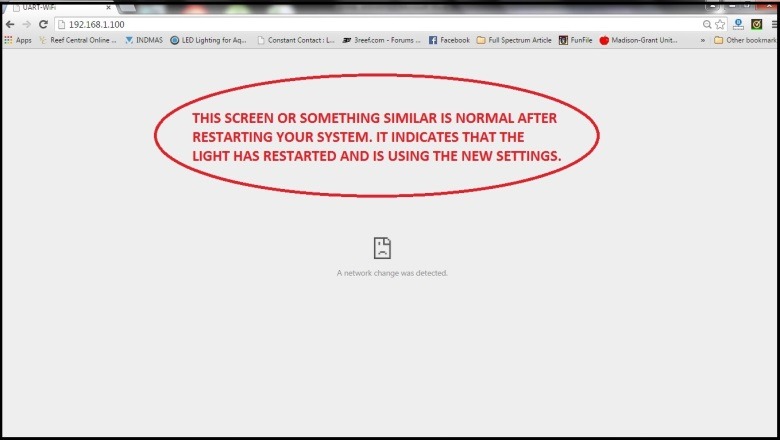
Once the system restarts you will lose connection with the wifi socket and you should get some sort of error screen on your browser notifying you that connection has been lost or unable to connect to 192.168.1.100. At this time the light is now connected to your home network. You can test this connection by skipping directly to section 3.
If you are connecting multiple lights to your network you will need to perform this step for each light, one at a time, selecting a different IP address for each. Please plug in the next light and return to step 2.1.


Now you need to open the Orphek app- Return to your home screen and locate the Orphek app and click on it to open.

Once you open the Orphek application the animated Orphek splash screen will be displayed.

You will need to click on SEARCH to locate your light. If all of your lights do not appear please click the SEARCH button up to 5 times as it goes through all of the potential IP addresses.


Connecting the light to your home router and setting a static IP address will ensure that your lights are accessible even after months of operation without changes. Keep in mind that the Orphek Atlantik series is designed to operate without continued need for programming and changes. The system will continue to follow its program daily until you make a change via the app. The Atlantik series does not require continual connection with the app or with other lights in order to operate. All lights operate on their own, via their internal circuitry. This eliminates the reliance on a master unit or device to control the lights 24/7. The system is designed to be set and then allowed to work on its own for years without changing. We suggest that any changes be well planned and as infrequent as possible.
When setting an IP address, most routers use 192.168.1.xxx where xxx is the actual location of the device on the network. Some routers use 10.0.0.xxx. You will need to determine the IP format that your router uses. If you are unable to determine this you can try the 192.168.1.xxx setting and if needed you can perform a factory reset to restore the light and begin again.
When choosing your IP address, Orphek suggests using an IP address that’s not likely to cause conflicts. For this reason we suggest using IP addresses higher than 120. For example; 192.168.1.121 or 192.168.1.122
When assigning multiple lights to a network it is beneficial to keep the lights grouped in a series in order to make it easier to keep them straight. As you can see in the examples, only the last three numbers change so you could do 121, 122, 123,124 … In this example we will be setting a light to the IP address of 192.168.1.131
The subnet mask will always be the same for the lights. 255.255.255.0
Your router info and password must be EXACT with capitals, spaces, number and symbols. Please have this info onhand before entering it into the firmware. If a mistake is made and the light restarted, you will need to perform a factory reset in order to restore the firmware and begin again.
Connect to wifi-socket in your android settings.
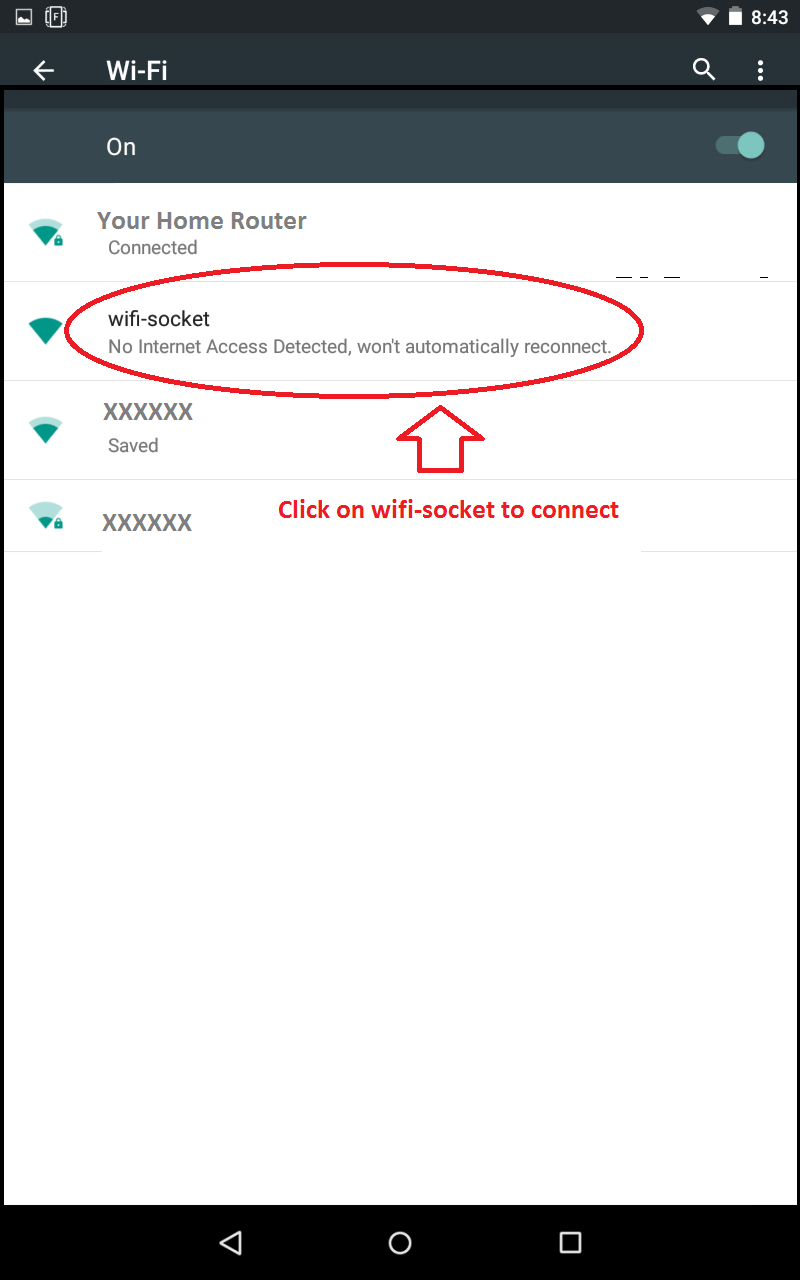

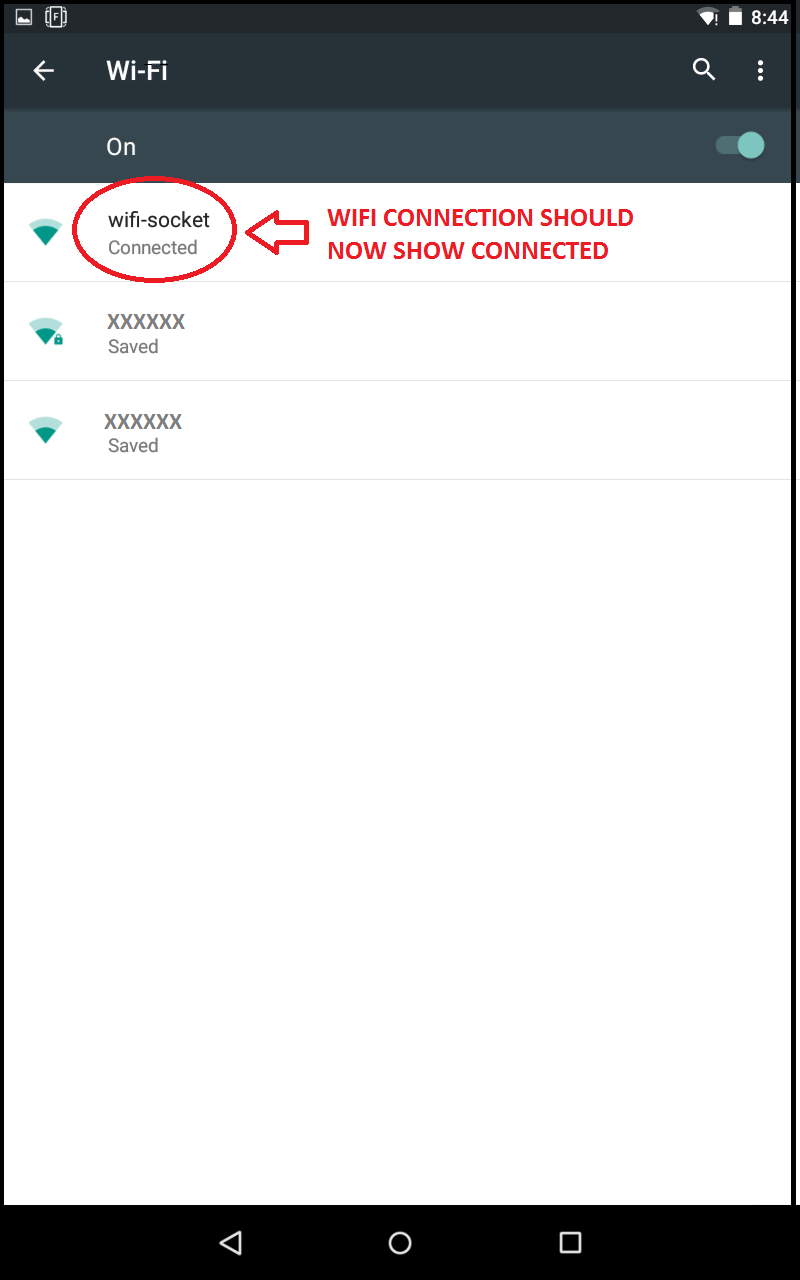
You will now access the firmware in the light using your web browser. This can be Google Chrome or any other web browser that is installed on your Android device. Please keep in mind that you must remain connected to “wifi socket” while performing these steps.
Open your web browser and type “192.168.1.100” in the address bar.
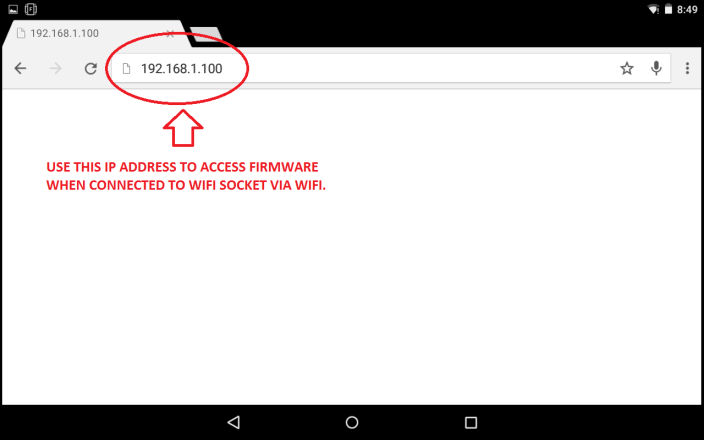
This will bring up the UART firmware screen and prompt you for a username and password.
- Username: Admin
- Password: 000000
Once you have accessed the firmware screen you will make a few changes and restart the system.
Once you have entered all of the correct info and ensured that it is all correct. You will need to restart the system. PLEASE VERIFY THAT ALL INFO IS CORRECT BEFORE RESTARTING THE SYSTEM.
Once the system restarts you will lose connection with the wifi socket and you should get some sort of error screen on your browser notifying you that connection has been lost or unable to connect to 192.168.1.100. At this time the light is now connected to your home network. You can test this connection by skipping directly to section 3.
If you are connecting multiple lights to your network you will need to perform this step for each light, one at a time, selecting a different IP address for each. Please plug in the next light and return to step 2.1.
Now you need to open the Orphek app- Return to your home screen and locate the Orphek app and click on it to open.
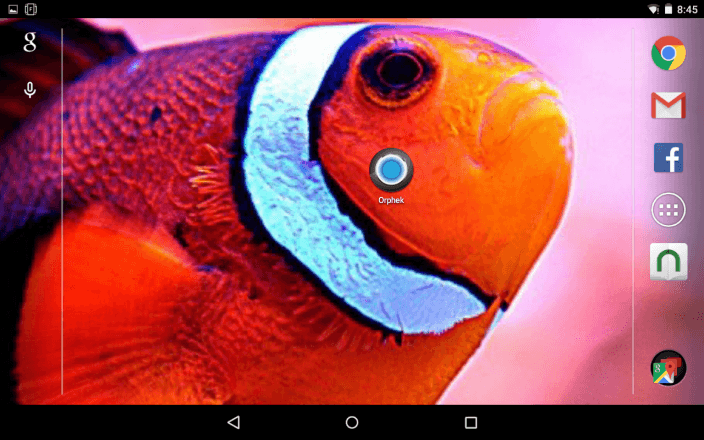
Once you open the Orphek application the animated Orphek splash screen will be displayed.
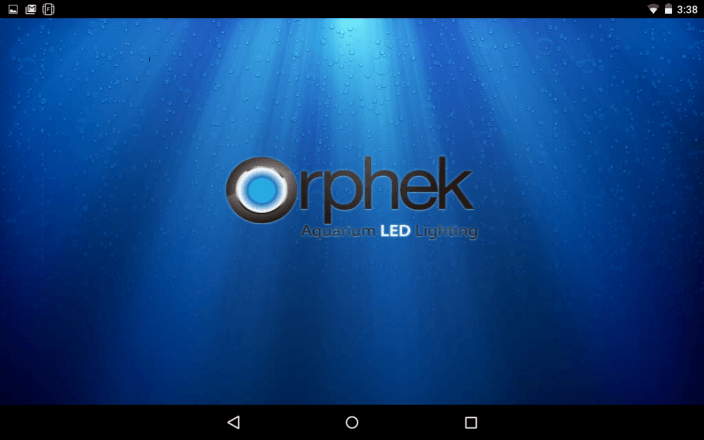
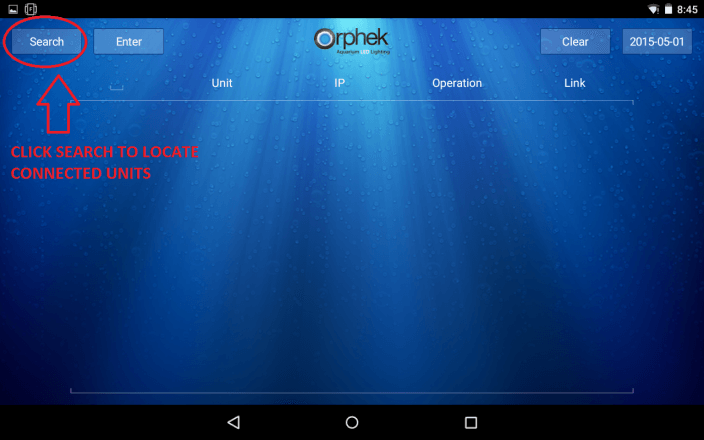
You will need to click on SEARCH to locate your light. If all of your lights do not appear please click the SEARCH button up to 5 times as it goes through all of the potential IP addresses.
Orphek
Orphek- Aquarium LED lighting
View Badges
Platinum Sponsor
Partner Sponsor 2023
Partner Sponsor 24
The above steps are the BEST way to work with the Atlantik.
If you have questions you can email me at [email protected] or call us at 800.398.6675
Thanks. Looking forward to seeing what you do with this.")
If you have questions you can email me at [email protected] or call us at 800.398.6675
Thanks. Looking forward to seeing what you do with this.
I have two of the Orphek 72 watt reef pendant's but have not set them up yet....one is WYFI and one is standard reef pendant. Could you recommend s simple controller for them for sunrise/sunset?
Thank You,
Mace
Thank You,
Mace
Orphek
Orphek- Aquarium LED lighting
View Badges
Platinum Sponsor
Partner Sponsor 2023
Partner Sponsor 24
The PR72's are not available in Wifi versions. Can you send me an email and we can figure out what you have and get you up and running?
[email protected]
[email protected]
I am so familiar with the process of resetting and configuring my Atlantik fixtures, I could do it in my sleep. I must have done it a hndred times, literally.
I have not been able to get both fixtures configured correctly, and to remain configured.
Each time a few days goes by, I loose the ability to control one specific fixture. Orphek replaced the control board once already with no real impact.
I suspect the issue revolves around an IP address conflict. At this point I've pretty much given up, and run the lights independently as wifi socket, and just send my custom program and let it go. Scott's been a great help, but we have found no solution.
Thank you Scott my PR72s have the apex cable not WiFi, but you do offer WiFi pendant's per your web site? I am looking for a controller like said with dimming/sunrise/sunset for these fixture's. Nothing that couldn't be posted here for any future needs by other hobbiest. These are not the main lighting for my 300 but additional lighting if wanted by me.
Mace
Mace
Orphek
Orphek- Aquarium LED lighting
View Badges
Platinum Sponsor
Partner Sponsor 2023
Partner Sponsor 24
If you have the PR72 then they are dimmable via an aftermarket controller such as an APEX or Reef Keeper. There are even some DIY options that you can research.
If you want the WiFi pendant then you need to look at the Atlantik Pendant. Here is the link.
https://orphek.com/atlantik-pendant-wifi/

If you want the WiFi pendant then you need to look at the Atlantik Pendant. Here is the link.
https://orphek.com/atlantik-pendant-wifi/


