Navigation
Install the app
How to install the app on iOS
Follow along with the video below to see how to install our site as a web app on your home screen.
Note: This feature may not be available in some browsers.
More options
You are using an out of date browser. It may not display this or other websites correctly.
You should upgrade or use an alternative browser.
You should upgrade or use an alternative browser.
Show Me Your Control board for your Apex Display!
- Thread starter FLSharkvictim
- Start date
-
- Tags
- apex controller
- Tagged users None



- Joined
- Apr 30, 2016
- Messages
- 1,568
- Reaction score
- 1,193
- Location
- El Paso Tx
- What state or country do you live in
- Texas
Here is mine still in the works .. waiting on my GHL P4 to come in from Black Friday Sales...


- Joined
- Mar 16, 2011
- Messages
- 2,972
- Reaction score
- 787
- Location
- Port St. John, FL
- What state or country do you live in
- Florida
Which tunze powerheads do you have?@Vwfan - This is what my Apex panel currently is looking like! Are your referring to the Raceway ducks that are gray or the computer grommets?



Lol super jealous of everyone on here. I have limited space, no option for a cabinet, and honestly hate the look of the new APEX (so no mounting next to the tank out in the open). So here is my current work in progress for mounting in my stand. I got it today and don't plan on sleeping tonight

Here is the beginning stage of mine.

would love to see the progress and/or the finished product


Thinking about picking this up to mount my gear. Any thoughts?
https://www.marinedepot.com/Standar...ccessories-Marine_Depot-MD7116-FIAQAA-vi.html
https://www.marinedepot.com/Standar...ccessories-Marine_Depot-MD7116-FIAQAA-vi.html
I think their pre-made board is great for those who want to pay 8x more than they could to make a board themselves (that would be perfectly fit for their needs)... OR for busy / lazy / non-DIYer folks with cash to burn.Thinking about picking this up to mount my gear. Any thoughts?
https://www.marinedepot.com/Standar...ccessories-Marine_Depot-MD7116-FIAQAA-vi.html
I'm just finishing my equipment cabinet and I have to say not only does it perfectly suit my needs, it cost WAY less, was fun to build, and looks way better, tbh ;Shy ;Smug


Thinking about picking this up to mount my gear. Any thoughts?
https://www.marinedepot.com/Standar...ccessories-Marine_Depot-MD7116-FIAQAA-vi.html
I was thinking the same thing but decided I wanted to build my own. Actually i found a great TV cabinet on wheels for only $17 at Aldi’s! Plan on making some additions and adjustments for my Apex, modules, energy bar and mp40’s. Will throw some LED’s that I can voice control and bam should have a great aquarium controller cabinet that looks worthy in the living room. Will post pics when done.
Looking forward to seeing the finished productI was thinking the same thing but decided I wanted to build my own. Actually i found a great TV cabinet on wheels for only $17 at Aldi’s! Plan on making some additions and adjustments for my Apex, modules, energy bar and mp40’s. Will throw some LED’s that I can voice control and bam should have a great aquarium controller cabinet that looks worthy in the living room. Will post pics when done.




Nothing to fancy with mine.. I would like to eventually and something taller so I can fit all my pump controls on it..


vetteguy53081
Well known Member and monster tank lover
View Badges
Partner Member 2024
Excellence Award
Reef Tank 365
RGB
Article Contributor
Tampa Bay Reef Keepers
West Palm Beach Reefer
Hospitality Award
Ocala Reef Club Member
305 Reef Club
Wisco Reefers
Midwest Reefer
Fish Medic
MAC of SW Florida
Rock Pool Reef Keepers
R2R Secret Santa 2023
My Tank Thread
My Aquarium Showcase
GHL and Ecotech components here but same basic thing.
I decided to run the electrical raceway around the perimeter of the mounting board.


VERY CLEAN LAYOUT
vetteguy53081
Well known Member and monster tank lover
View Badges
Partner Member 2024
Excellence Award
Reef Tank 365
RGB
Article Contributor
Tampa Bay Reef Keepers
West Palm Beach Reefer
Hospitality Award
Ocala Reef Club Member
305 Reef Club
Wisco Reefers
Midwest Reefer
Fish Medic
MAC of SW Florida
Rock Pool Reef Keepers
R2R Secret Santa 2023
My Tank Thread
My Aquarium Showcase
Some. . . . FANTASTIC WORK DISPLAYED !!! I AM CONSIDERING THE NEW BOARDS AVAILABLE VIA MARINEDEPOT. THEY ARE STURDY AND WELL STRUCTURED FOR VARIOUS COMPONENTS


Some great setups posted above.
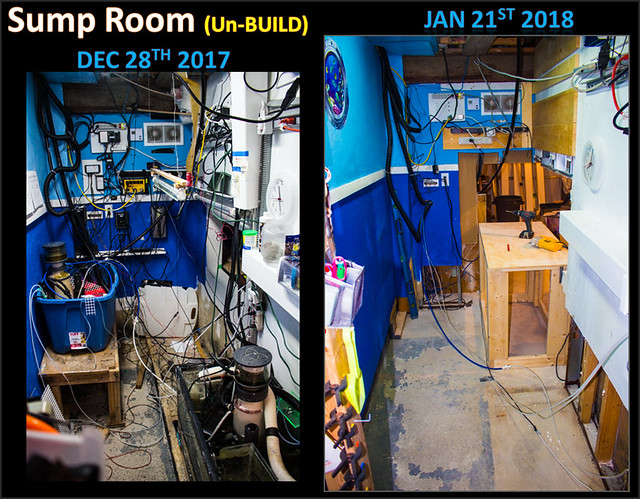
Many of these kinds of neat arrangements is what inspired me when I was redoing my sump room.
I kind of wish I saw some for the Large Hole Cover-plate ideas.
What I learned over time and on my previous attempts is make your wiring flexible for expansion and maintenance.
Also design your wiring PORT HOLES and Conduits OVERSIZED to be able to easy remove your heater, pump cord etc for repetitive maintenance.
Nothings is worse the perfect wiring that you have to rip apart every time you need to clean a pump. Nothing is worse than wire overlaps, and tight tie wrapped bundles that look great to start, but nightmare to remove one wire.
Here is what I did this time. DUal Tank, Dual Sump Equipment Closet/room.
It's not a cabinet tight PANEL layout like you are planning, but I did designed for distance, easy wire pulls, and easy remove-and-replace.
There are (HIDDEN) removable/hinged panels below, above and beside easy WHite Plate for wire access. (HAND SIZE)
THE VERTICLE SQUARE (Hollow Fence Posts) are large CONDIUTS for both Wire and Pumbling runs.
The rest of wiring runs are behind drywall.

All the best with your project.
Many of these kinds of neat arrangements is what inspired me when I was redoing my sump room.
I kind of wish I saw some for the Large Hole Cover-plate ideas.
What I learned over time and on my previous attempts is make your wiring flexible for expansion and maintenance.
Also design your wiring PORT HOLES and Conduits OVERSIZED to be able to easy remove your heater, pump cord etc for repetitive maintenance.
Nothings is worse the perfect wiring that you have to rip apart every time you need to clean a pump. Nothing is worse than wire overlaps, and tight tie wrapped bundles that look great to start, but nightmare to remove one wire.
Here is what I did this time. DUal Tank, Dual Sump Equipment Closet/room.
It's not a cabinet tight PANEL layout like you are planning, but I did designed for distance, easy wire pulls, and easy remove-and-replace.
There are (HIDDEN) removable/hinged panels below, above and beside easy WHite Plate for wire access. (HAND SIZE)
THE VERTICLE SQUARE (Hollow Fence Posts) are large CONDIUTS for both Wire and Pumbling runs.
The rest of wiring runs are behind drywall.
All the best with your project.
vetteguy53081
Well known Member and monster tank lover
View Badges
Partner Member 2024
Excellence Award
Reef Tank 365
RGB
Article Contributor
Tampa Bay Reef Keepers
West Palm Beach Reefer
Hospitality Award
Ocala Reef Club Member
305 Reef Club
Wisco Reefers
Midwest Reefer
Fish Medic
MAC of SW Florida
Rock Pool Reef Keepers
R2R Secret Santa 2023
My Tank Thread
My Aquarium Showcase
M60Some great setups posted above.
Many of these kinds of neat arrangements is what inspired me when I was redoing my sump room.
I kind of wish I saw some for the Large Hole Cover-plate ideas.
What I learned over time and on my previous attempts is make your wiring flexible for expansion and maintenance.
Also design your wiring PORT HOLES and Conduits OVERSIZED to be able to easy remove your heater, pump cord etc for repetitive maintenance.
Nothings is worse the perfect wiring that you have to rip apart every time you need to clean a pump. Nothing is worse than wire overlaps, and tight tie wrapped bundles that look great to start, but nightmare to remove one wire.
Here is what I did this time. DUal Tank, Dual Sump Equipment Closet/room.
It's not a cabinet tight PANEL layout like you are planning, but I did designed for distance, easy wire pulls, and easy remove-and-replace.
There are (HIDDEN) removable/hinged panels below, above and beside easy WHite Plate for wire access. (HAND SIZE)
THE VERTICLE SQUARE (Hollow Fence Posts) are large CONDIUTS for both Wire and Pumbling runs.
The rest of wiring runs are behind drywall.
All the best with your project.
This is not a room- it's a lab !!
IMPRESSIVE IT IS!
Thanks.M60
This is not a room- it's a lab !!
IMPRESSIVE IT IS!
But this was the LAB look, during the rebuild since I had to keep two tanks running the whole time.
Yes, before anyone says, it was a short-term fire hazard that luckily never happened.


- Joined
- Dec 31, 2017
- Messages
- 333
- Reaction score
- 273
- What state or country do you live in
- Florida
Nice
- Joined
- Apr 3, 2017
- Messages
- 19
- Reaction score
- 7
- Location
- Atlanta, GA
- What state or country do you live in
- Georgia
The front of these control panels all look great! What I'd really like to see though is the wire management on the back side that is not normally visible!
Here is a Video that shows (step by step) Time Lapse Photos of my Panel Installation, Larger Holes behind Panels, with wire space areas behind. (1/3 of the way into the video). It kind of shows how I added some extra holes, access ports.The front of these control panels all look great! What I'd really like to see though is the wire management on the back side that is not normally visible!
I wouldn't call it wire management since I just run and tuck wires behind the drywall hollow space. However I did add some wire tray conduits for exterior wire runs.
I did have to drill holes into the Verticle Studs to run horizontally behind wall.
It all generally worked out since the Extra-Access-Holes are all sized to fit my hand/arm into the wall or the Rectancular White Tube. Some runs I needed a stiff wire to run wires horizontally (to deal with Gravity and drooping cords)
One thing I did that also worked out, was using SPLIT-Wire Loom to NEATLY bundle my 6 wires going to T5 Pairs to appear as single CORD.. It's shown in the video.
Again, this isn't tight cabinet work like displayed in many examples above.
I highly appreciate how some of these cabinet layouts are done so tidy and nice.
Some really slick looking and very clean layouts.
Last edited:

- Joined
- Dec 28, 2015
- Messages
- 1,201
- Reaction score
- 1,712
- Location
- Houston, TX
- What state or country do you live in
- Texas
Still a work in progress. I dont have as much going on as you do so I was able to get away with a smaller design and incorporate it into one of my side cabinets. I made a tilt down door/board and chose to mount the EB8 on the back because I hate looking at everything plugged into it.


Thank you for this idea.
Can you please help me understand it a bit more.
How do you make it stay straight up?
and does the tilt offer a better access than say - swivel? If you were to make it go back like a door?
thoughts?

- Joined
- Apr 5, 2017
- Messages
- 95
- Reaction score
- 48
- What state or country do you live in
- New Jersey
I know this is old but can you tell me where you bought that wiring hiding Channel its nice anecdote looks sturdy.