This is my most amazing build! "Moving"

zcedric

Active Member
View Badges
Joined
Apr 20, 2017
Messages
189
Reaction score
148
Location
Cleveland
What state or country do you live in
Ohio
Rating - 0%
0   0   0
Good Day Reef2Reef Members
(70g, 1/2" rimless tank/ 20g, 1/4" rimless refugium, stand and more)

My Name is Cedric and I am gonna move from an appartment into a house with way more space. I am located near Cleveland. I am about 28 years old and this build is gona be my second build with 90 gallons of valume. I am in the hobby for about roughly 2 years. Well, my first build was some crappy tank which I bought from Craigstlist (65.-) down and try to make my best with it. It was a trial. But know... I will show you my best work. It will cost a lot but how most of us now... we just love the hobby so much. It will take me about a 1-2 month to finish everything.​

____________________________________________________________________

Progess connection links
  1. Tear down old tank: Here
  2. Building
    1. Building refugium: Here
    2. Building tank 1: Here
    3. Building tank 2: Here
    4. Building stand frame 1: Here
    5. Test fill the tank: Here
    6. Building stand frame 2: Here
  3. Piping:
  4. Fill with water/salt
    1. Rockwork:
    2. Add old life stock:
  5. Lights:
  6. Make stand finish
    1. Casing:
    2. Doors:
  7. Dosing:
  8. Chiller:
  9. Conclusion:
(project list ist not done yet)
____________________________________________________________________

1. Start!

Just tonight I started to tear down my old tank. It is one big mess in the appartment. Look at the pictures. It took me about 4-5h to move my current crappy tank into a temporary spot.


I also managed today to get the same tank completly going on a temporary stand till i am moved to the new place and a new tank is half way going. Onces this is completed i am gona move all live stock from here to my new tank/house.


Tomorrow
I will start building my new tank and stand at the new house. It is gona be my first day at the new place. I already got glass from a local glass shop delivered.
  • My plan is to write and update this build every 3-4 days.
  • I am really excided to keep continou on this project.
  • The new tank is gona be awesome!

Be ready for a:
1/2" thick rimless tank. DIY tank and sump!

IMG-20180216-WA0000.jpeg


IMG-20180216-WA0002.jpeg


IMG-20180216-WA0008.jpeg
 
Last edited:
Is that a mangrove I see sticking out the top?? What you got going on back there?
 
Is that a mangrove I see sticking out the top?? What you got going on back there?

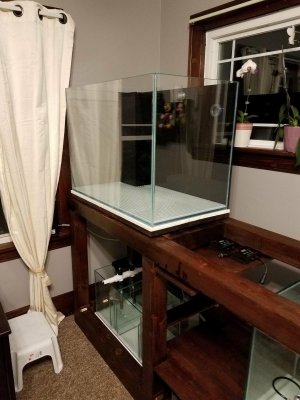
Yes! You see that right. I have 3 of them growing in my overflow box. I have them in there for about a month. Growing nicely. I love how they look!
 
That was a joke you know? That stand could hold Panzerkampfwagen VIII Maus.

haha, not so sure about that, but maybe :p

I just like to use 1 piece of wood and not a complicated wood setup with many braces, reinforcments around it and hope it will not bend over the years :p
 
Good Day Reef2Reef Members
(70g, 1/2" rimless tank/ 20g, 1/4" rimless refugium, stand and more)

For more project progresses klick: Here
And then simply press which topic you would like to read about.

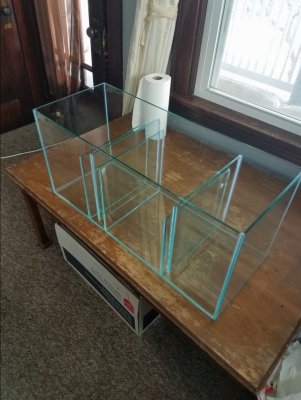
So, the last three days were really busy with moving everything. Still, I could start working on my first element which is the refugium. I am really happy that my girlfriend and her family did the most of the moving and start putting the furniture in the right place. We actually moved everything in one day. The only thing left at the old place is my old tank running with all my livestock.

2. Building

1. Building refugium

Needed Material:
- Precut glass (I got it from a local glass shop for about 200.-)
- Momentiv RTV 100 Silicon (I think it is one of the best silicons to make tanks) (10-15.-)

So the technique of mine to make a DIY tank is pretty simple. I used 90-degree clamps and clamped everything together with them. The glasses have about 1 zip tie distance to each other. I literally used zip ties to make the distances. This helps to have the equal amount of sealant all the way around. This also helps that less air bubbles get catched in between. I first clamped everything and then applied silicon just in the corners and then I simply waited 24h.


After 24h of waiting I removed the zip ties and clamps and then taped everything to add the silicon all the way around. I first added silicon on the inside of the tank. It is really important to remove the tape about 10-15 minutes after adding silicon or the tape will catche the silicon with it. Faster is better!

Just about 2 hours later i did the outside. I used a finger and that even without gloves to press the silicon between the gaps. Also again, I removed the tape 10-15 minutes soon after adding silicon.

I also think it is a good idea to remove any rest silicon or dirt on the glass with a razor blade before the silicon is fully dry. It think it looks already pretty good!


And yes we still have snow.. ohio.. anyway. Now I will wait about 10 days before filling with water. It is really important to let the silicon dry as long as possible.

For the next update be ready for a:
1/2" thick rimless tank. It will take me about 4-5 days. It takes longer because the tank is bigger than the refugium and I am adding a surface skimmer and paint the back side black.

20180307_214126.jpg


20180307_214135.jpg


20180307_214141.jpg


20180311_120325.jpg


20180311_120334.jpg
 
Last edited:
Good Day Reef2Reef Members
(70g, 1/2" rimless tank/ 20g, 1/4" rimless refugium, stand and more)

For more project progresses klick: Here
And then simply press which topic you would like to read about.


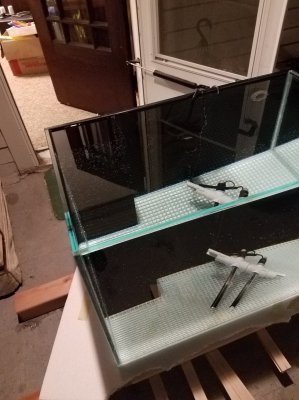
I started working on my main tank and also a little on my stand. Today, I just want to talk about the tank and do another writing for the stand later on. So, I am just gonna show a couple pictures of the tank. If sombody is interested how exactly i made it, please read this: Here
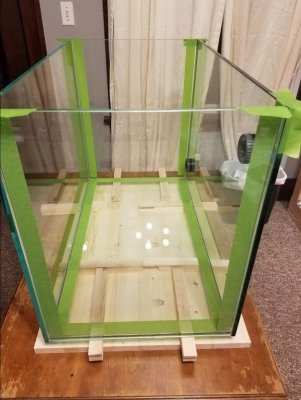
I used the same technique to do the main tank. I just used a little thicker glass (1/2").
2. Building
2. Building tank 1

Needed Material:
- Precut glass (I got it from a local glass shop for about 750.-)
- 2 x Momentiv RTV 100 Silicon (I think it is one of the best silicons to make tanks) (10-15.-)
- Wooden plate (Homedepot)
- Wooden spacers (Homedepot)


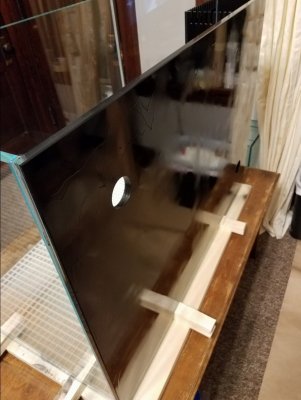
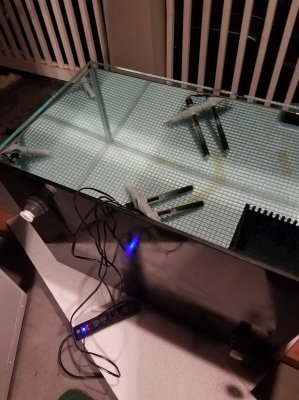
The holes for the water inlet and outlet are on the back side of the Tank. One is all the way on the top and another one on the other side all the way on the bottom. (Please ignore thor, it's my entertainment while crafting, haha)


I used a 1/2" wooden plate and many wooden spacers to level the tank while sealing/setting. This will take extra stress out of the glass. It happen to me ones that the glass cracked in half because I set it up on a carpet. This added to much pressure on the glass while drying.


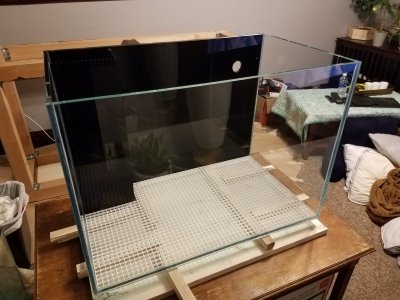
I will give the tank about 14 days to fully dry. During this time I am gonna paint the back black and will add a corner surface skimmer.

For the next update be ready for a:
Black painted back of the tank and a corner skimmer.

20180301_003750.jpg


20180301_003755.jpg


20180301_003801.jpg
 
Following!

Thank you. I always like to hear this.
I try to get another update out before the coming weekend. I have an Ice-Skating competition this weekend. It is gonna be super busy.

I hope it has absolutely no leaks for the first time filling. Would be awesome. Just a bit more time then I fill it up!
 
Good Day Reef2Reef Members
(70g, 1/2" rimless tank/ 20g, 1/4" rimless refugium, stand and more)


For more project progresses klick: Here
And then simply press which topic you would like to read about.


The last 5-7 days i finished my tank. I will fill it up next weekend. I hope it will be waterproof.
2. Building
3. Building tank 2
https://www.reef2reef.com/attachmen...1/?temp_hash=82181c8dd7ebc144b23e41d64c0d2ce7


I position my surface skimmer and did all the sealings on it. This was actually pretty simple and i used again the technique with my Zipties. Please read 2 post before if you would like to know the technique. I used my fingers to get the all the way down. Because my silicon gun was too big.


I used some kind a paint from Home Depot. I think it was Rust.. something.. haha. Spraybottle.

For the next update be ready for a:
How you see in the back I started the stand I will shortly update about this.
20180304_104509.jpg


20180304_104513.jpg


20180304_104518.jpg


20180305_231430.jpg


20180305_231436.jpg


20180305_231440.jpg


20180305_231448.jpg


20180305_231453.jpg
 
Last edited:

Good Day Reef2Reef Members
(70g, 1/2" rimless tank/ 20g, 1/4" rimless refugium, stand and more)


For more project progresses klick: Here
And then simply press which topic you would like to read

2. Building
4. Building stand frame 1

The stand is pretty much straightforward. Not much to explain.


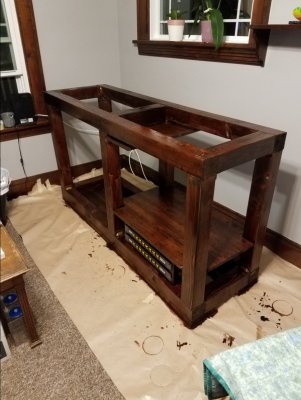
I used some 4 x 4 wood and some metal brackets and build me this little stand. You see also some of my equipment. It is standart equitment nothing very special.

- Pump for return to tank
- Pump for chiller and reactors
- 3 reactors (Nitrate, Phosphate, Carbonate...)
- CA reactor with Co2 tank
- Water Resevoir and salt station.
- Some control (on the top)

I love the Jackobspumps already. I heard they are super quiet and they also look awesome.


It should be strong enough! haha
I use normal server switch bars for all my manual devices turn on/off.


I used some stain to make it a little more resistance against salt water and it looks already way better!

For the next update be ready for:
Filling up tank and set it on the new stand.

20180301_003805.jpg


20180301_003809.jpg


20180301_003813.jpg


20180301_003819.jpg


20180301_003821.jpg


20180305_231424.jpg


20180305_231426.jpg


20180305_231515.jpg


20180306_001638.jpg
 
Good Day Reef2Reef Members
(70g, 1/2" rimless tank/ 20g, 1/4" rimless refugium, stand and more)


For more project progresses klick: Here
And then simply press which topic you would like to read

2. Building
5. Test fill the tank
I just did it! LoL. It holds! OMG


Thank you for the support so far.

For the next update be ready for:
Set tank on the new stand and do more work on the stand.

31958913_10214833432703503_4131447475745587200_n.jpg


31963825_10214833432863507_8931866928528490496_n.jpg


32117027_10214833432983510_7889516741322080256_n.jpg
 
Good Day Reef2Reef Members
(70g, 1/2" rimless tank/ 20g, 1/4" rimless refugium, stand and more)


For more project progresses klick: Here
And then simply press which topic you would like to read


2. Building
6.Building stand frame 2

OMG folks!! My tank is actually fully Done!! and is running since like 3-4 weeks. I had no time to update this at all. But know it the time! I actually sitting at the airport and fly myself to vacation and my grildfriend needs to watch my tank and my other animals.
Just a side topic.. these are my cats. My little Striker (Savannah F1), is only 18 weeks old super cute. no?

36310243_10215195278629425_7644604816907304960_n.jpg


Haha, Anyway, this isn't the main topic. I would like to show you guys the whole build in the next 1 week. I try to post every second day and finish this. So I can show some coral and fish progress soon. Well be ready! haha. OMG where are my pics.. this is my work laptop.. lol.. sorry I drifted of again.


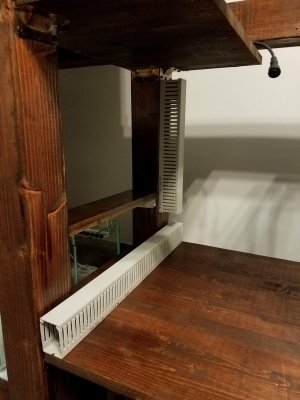
Well these are the pictures... Wire chanels.. motor controllers... water resevoir.. refugium.. with already installed refugium light which I changed later on thru a plant grow light with more power and a more white color.. I will show this in a later post and tell you which light I am using. I plan using cheato and some rock in my refu.

For the next update be ready for:
Piping

36337842_10215208624763070_725275820012077056_n.jpg


36341531_10215208624603066_8553258839762272256_n.jpg


36387740_10215208624523064_2904167133623615488_n.jpg


36412947_10215208623923049_2791485750330261504_n.jpg


36437851_10215208624203056_4889177619129434112_n.jpg
 

IF YOU HAD TO TAKE A REEFING EXAM, WOULD YOU PASS?

  • Yes!

    Votes: 32 45.7%
  • Not yet, but I have one that I want to buy in mind!

    Votes: 9 12.9%
  • No.

    Votes: 26 37.1%
  • Other (please explain).

    Votes: 3 4.3%

New Posts

Back
Top