Help me stop flooding my home

  • Thread starter Thread starter Be102
  • Start date Start date
  • Tagged users None

Be102

Valuable Member
View Badges
Joined
Nov 29, 2016
Messages
1,884
Reaction score
1,059
What state or country do you live in
Massachusetts
Rating - 0%
0   0   0
I would like to install the safety system that allows me to run my ro/di and have it shut off on its own. I currently have a three stage marine depot ro/di that has been upgraded with the brs upgrade kit (pressure gauge and tds moniter).

The way I make water is I have a traditional hose output in my basement and I just drain the water out the bottom of the house. I was wondering what is the process to say install a float valve in my 20 gallon ro/di bucket to prevent it from overflowing. I believe there has to be a way to stop the flow of water at the point of me filling the bucket.

What’s required?


I can add pics of my setup if necessary

 
I would be interested in hearing what people has to say about this as well. I refill my RO/DI container on top of my washer because I always forget I have it filling up and end up filling my washer 1/4 of the way up. Such a waste.
 
I purchased a float valve through Amazon for like 10 bucks and used a paddle bit to drill the hole accordingly and installed it at the top of my 55 gallon drum. When my drum fills up it stops my RO unit for me incase I forget to turn the water off at the valve.
 
There are two pieces you need (and one you could add):
The first thing you'll need is a float valve. This float valve (or something like it, depending upon your setup) will go on the output of your product water. The idea being that when your container fills up, the water shuts off. I've linked to the adjustable one - which is $1 more, but provides you with flexibility and options.
The second thing you will need is a shut-off valve. The float switch above will shut off the product water, but that will leave the waste water still flowing. The shut-off valve works via pressure; when the product line pressure increases (because of the float switch), this valve will create pressure on the waste line - causing that to shut off as well. These can be tricky to install (not hard - just potentially confusing), so be sure to follow the instructions included.

The other thing you could have (but do not need to) is an emergency shut-off. This device goes on the input line of your RO/DI system and should be located somewhere that would get wet in the case where your float switch fails (e.g.; wherever your house is currently flooding). This thing works such that when the included sponge gets wet, it expands and flips the lever that shuts off the flow of water into your system. You have to replace the sponge afterwords, so it's not at all a good primary shut-off, but as a cheap emergency back-up, it works great.

Final note; you'll be relying on an increase in pressure for all the above to work. This may (will likely) result in more pressure on your system than it's seen before. For this reason, you'll want to make sure that any connections you have for the 1/4" tubing have those blue clips in place (if the connections support them, of course). These clips "tighten" the connection and ensure that the o-rings are engaged. The connections often work without them (especially at lower pressures), but are safer with.
 
Last edited:
There are two pieces you need (and one you could add):
The first thing you'll need is a float valve. This float valve (or something like it, depending upon your setup) will go on the output of your product water. The idea being that when your container fills up, the water shuts off. I've linked to the adjustable one - which is $1 more, but provides you with flexibility and options.
The second thing you will need is a shut-off valve. The float switch above will shut off the product water, but that will leave the waste water still flowing. The shut-off valve works via pressure; when the product line pressure increases (because of the float switch), this valve will create pressure on the waste line - causing that to shut off as well. These can be tricky to install (not hard - just potentially confusing), so be sure to follow the instructions included.

The other thing you could have (but do not need to) is an emergency shut-off. This device goes on the input line of your RO/DI system and should be located somewhere that would get wet in the case where your float switch fails (e.g.; wherever your house is currently flooding). This thing works such that when the included sponge gets wet, it expands and flips the lever that shuts off the flow of water into your system. You have to replace the sponge afterwords, so it's not at all a good primary shut-off, but as a cheap emergency back-up, it works great.

Final note; you'll be relying on an increase in pressure for all the above to work. This may (will likely) result in more pressure on your system than it's seen before. For this reason, you'll want to make sure that any connections you have for the 1/4" tubing have those blue clips in place (if the connections support them, of course). These clips "tighten" the connection and ensure that the o-rings are engaged. The connections often work without them (especially at lower pressures), but are safer with.


Thanks for this, it was very clear and informative. A little off toPic but can you explain the flush valve thing as well to rinse the rodi out? I believe I have one just never installedcause I wasn’t really sure what to do with it or how to use it.
 
can you explain the flush valve thing as well to rinse the rodi out?
Sure.
A flush valve is usually incorporated with a flow restrictor since they are related in function. The RO membranes basically work like small (really small) nets. For these "nets" to work, you can't push stuff through them too hard because stuff just won't go through them that fast. If you try, they either don't work as well (if there is nowhere for the extra pressure to go, it will go through anyways and ruin them faster), or they actually help to clean off the surface of the "net" (if the excess pressure can go somewhere, it'll take debris and such with it).
So the flow restrictor is there to keep the membrane from having too much water pushed at it (which would either ruin the membrane or - at best - just be wasted over the long-term) while the flush valve is there to (temporarily) bypass the flow restrictor - with the aim of cleaning out the membrane over a short period of time.

In practice, the general rule of thumb is to open the valve (set it parallel to the valve, usually) for a few seconds (I used 10sec when I had a manual one) both before and after each use (clean when you start, clean when you're done). Along with this, you'll want to open it for an extended period (2-3min) once a month or so for a really good cleaning. Other than that, the valve should be closed so that the flow restrictor is in use. This combination should almost certainly extend the life of the membrane.
 
Sure.
A flush valve is usually incorporated with a flow restrictor since they are related in function. The RO membranes basically work like small (really small) nets. For these "nets" to work, you can't push stuff through them too hard because stuff just won't go through them that fast. If you try, they either don't work as well (if there is nowhere for the extra pressure to go, it will go through anyways and ruin them faster), or they actually help to clean off the surface of the "net" (if the excess pressure can go somewhere, it'll take debris and such with it).
So the flow restrictor is there to keep the membrane from having too much water pushed at it (which would either ruin the membrane or - at best - just be wasted over the long-term) while the flush valve is there to (temporarily) bypass the flow restrictor - with the aim of cleaning out the membrane over a short period of time.

In practice, the general rule of thumb is to open the valve (set it parallel to the valve, usually) for a few seconds (I used 10sec when I had a manual one) both before and after each use (clean when you start, clean when you're done). Along with this, you'll want to open it for an extended period (2-3min) once a month or so for a really good cleaning. Other than that, the valve should be closed so that the flow restrictor is in use. This combination should almost certainly extend the life of the membrane.

Thanks for taking the time to explain all of this. I am extremely appreciative and finally can understand what really is going on with my rodi.
 
DLH said it best, check out the videos BRS has on their $10 float valve, i installed this to my brute trash cans and i haven't had a flood since. my rodi is a brs model that comes with a shut off valve standard. you man need to purchase that part like DLH mentioned
 
DLH said it best, check out the videos BRS has on their $10 float valve, i installed this to my brute trash cans and i haven't had a flood since. my rodi is a brs model that comes with a shut off valve standard. you man need to purchase that part like DLH mentioned
Was the float valve you purchased the adjustable one or the standard one?

I want to buy the little kit that a comes with the auto shut off and the float switch yet it seems in the picture something else is needed that would require me to buy the adjustable one, the shut off and something I'm unsure of.
 
As stated above, float valve and ASO. While emergency shut off is be optional. I think it should be added for added piece of mind.
Also, these devices do and will failed (i.e., age, defect and operator error). So, I drill a hole near the top of the storage container and run a pipe into a second container (which I used for mixing salt) to the RODI storage as an overflow in case of ASO failure and collect the overflow water. Lastly, I added a cheap safe solution to my routine when ever I run my RODI. "Alarm" clock on my cellphone. I estimated when my water will be filled and set my alarm to the loudest alert.
 
As stated above, float valve and ASO. While emergency shut off is be optional. I think it should be added for added piece of mind.
Also, these devices do and will failed (i.e., age, defect and operator error). So, I drill a hole near the top of the storage container and run a pipe into a second container (which I used for mixing salt) to the RODI storage as an overflow in case of ASO failure and collect the overflow water. Lastly, I added a cheap safe solution to my routine when ever I run my RODI. "Alarm" clock on my cellphone. I estimated when my water will be filled and set my alarm to the loudest alert.
Do you have a picture of your setup? I am picturing a larger bin than needed and then just a hole cut into the side allowing it to flow to another bucket, just unsure how you did the pipe and whatnot. is it at an angle or just straight and since it has no water the flow has to fill it as well. This is a great idea I didnt think of using. At this point in time I am strictly making ro/di in my basement which has a cement floor. I just want to stop wasting water ultimately rather than necessarily protect the floors... Already learned the hardware upstairs :oops:
 
i went with the non adjustable float valve, one less thing to rust/malfunction
 
WARNING:

My RO/DI came with the flow valve that is supposed to shut off the waste water when the float valve shuts and the pressure on the outflow goes up. That valve failed after a month of service.

If you trust in valves and float switches you will almost certainly have a flood from a similar failure.

My tank and to are in the garage because they are safe to flood there.
 
Available at saltwateraquarium.com
Just another piece of insuance.

Screenshot_20181213-102150_Samsung Internet.jpg
 
Do you have a picture of your setup? I am picturing a larger bin than needed and then just a hole cut into the side allowing it to flow to another bucket, just unsure how you did the pipe and whatnot. is it at an angle or just straight and since it has no water the flow has to fill it as well. This is a great idea I didnt think of using. At this point in time I am strictly making ro/di in my basement which has a cement floor. I just want to stop wasting water ultimately rather than necessarily protect the floors... Already learned the hardware upstairs :oops:
Rodi storage by t@#$%c, on Flickr
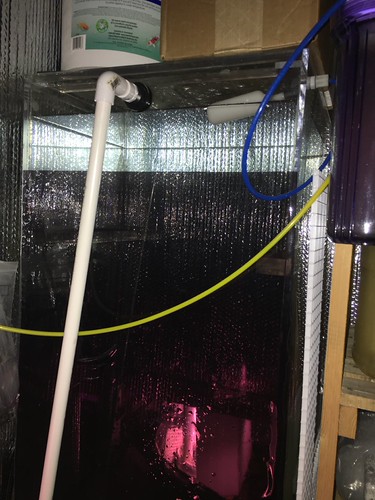
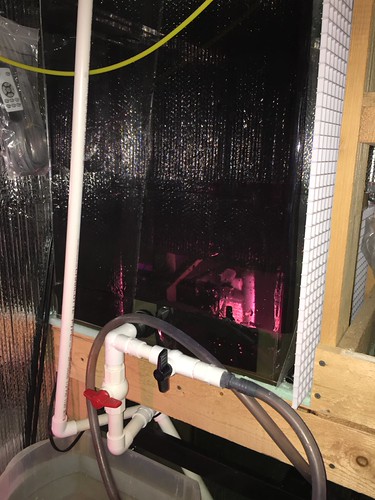
I drilled hole on top just ABOVE the float valve. Notice, it must be higher than float valve.
Run a pipe out of that hole into another container. I have mine set on top of a shelve and the mixing container/tank is on the bottom for easy access. You can do side by side, but one have to be higher/taller than the other.
 
Rodi storage by t@#$%c, on Flickr
I drilled hole on top just ABOVE the float valve. Notice, it must be higher than float valve.
Run a pipe out of that hole into another container. I have mine set on top of a shelve and the mixing container/tank is on the bottom for easy access. You can do side by side, but one have to be higher/taller than the other.
Thanks for this it was exactly what I was envisioning. Seems simple enough !
 
Thanks for this it was exactly what I was envisioning. Seems simple enough !
I flooded my house so many times in the past (thus my screen name ;)). The bad part is not cleaning up or fixing the damage. It's the nagging that I received. ;Muted

 
Avast make a device called the barrel tender. Not cheap, but works well.
 

IF YOU HAD TO TAKE A REEFING EXAM, WOULD YOU PASS?

  • Yes!

    Votes: 32 45.7%
  • Not yet, but I have one that I want to buy in mind!

    Votes: 9 12.9%
  • No.

    Votes: 26 37.1%
  • Other (please explain).

    Votes: 3 4.3%

New Posts

Back
Top